Where to find the Facebook pixel?
The Facebook pixel is a code that Facebook provides to website owners to place on their website pages. This “pixel” tracks the activity of visitors on your blog and then allows the application to serve targeted ads to these people as they browse Facebook.
Want to create a personalized audience? Want to track your conversion rates in real time? Then this guide will surely interest you.
- Facebook (Meta) provides a code, called “pixel”, to be placed on your website.
- This pixel allows Meta to collect data on the actions performed by your website visitors.
- Integrating a pixel on your website pages allows you to better target your Facebook ads.
- With this pixel you can track conversions and quickly see which of your ad campaigns are most effective.
- There are several ways to create a pixel (all of which are fairly easy to implement).
- You can install the pixel directly on Shopify, WordPress, WooCommerce and other e-commerce platforms.
The facebook pixel: what is it?
The Facebook pixel is a code that you place on your website. It tracks the actions of users who visit your blog and allows Facebook to deliver targeted ads to these viitors when they browse their Facebook page.
This is a really interesting element because it can be used to track conversions or to create a personalized audience. But let’s take a closer look at what adding a facebook pixel to your blog can do for you.
Also read : RTFM: The forgotten but necessary step in technology problem-solving
What is the facebook pixel used for?
The Facebook pixel is really useful because it can allow you to :
- Track conversions;
- create personalized audiences and do retargeting;
- Improve your Facebook advertising campaigns.
Conversion tracking
The Facebook pixel is very useful for conversion tracking. You can use it to find out:
- how many people visited your website;
- how many people add a product to their cart;
- how many people make a purchase.
This data is very valuable because it allows you to identify which Facebook ads are generating the most sales. You can then optimize each ad and increase your conversion rate.
Create personalized audiences
You can also use the Meta pixel to create custom audiences.
For example: you can create an audience of people who have visited your website in the last 30 days. This is very useful for retargeting, as you can show these users targeted ads that encourage them to come back to your online store to make a purchase.
Improve your advertising campaigns
The Facebook Pixel also allows you to improve your Facebook ad campaigns.
For example, if you’re running an ad campaign on Meta and you’re not getting the results you want, you can use the Facebook Pixel to find out why.
It could simply be that your ad is being shown to the wrong people. Or maybe people are seeing your ad but aren’t interested in what you’re selling.
Either way, the Facebook Pixel can help you understand what’s going on so you can adjust your ad campaign for better results.
How to create a Facebook Pixel easily?
If you want to create a Facebook Pixel, you need to have a Facebook Ads account.
Once you have setted up your account, you can create a Facebook Pixel by following these steps:
- Go to the Business manager and click on “event manager“.

- Click on the small green “+” “connect data sources“.

- Check the “Web” box.
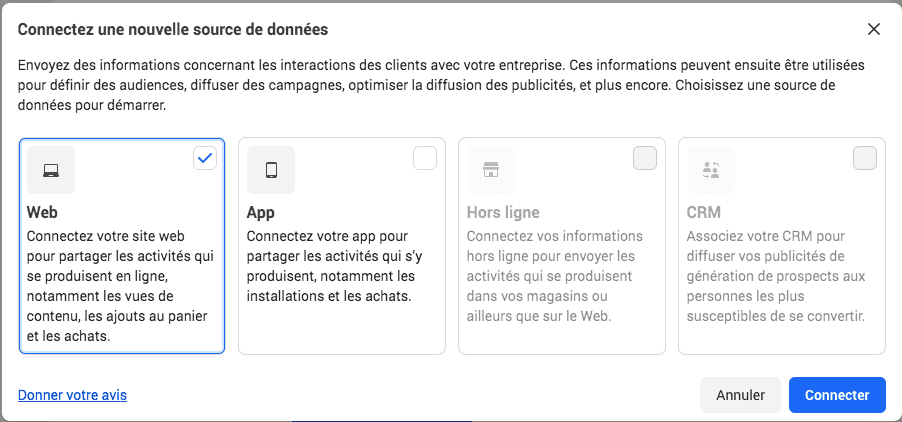
- Enter a name for your pixel and click on the “Create” button.
- That’s it! Your pixel is created! You will be able to find it by clicking on the small triangle “data source“.

That’s all there is to it! You see, it’s pretty quick?
Now that you have created your pixel, you need to install it on your site. So let’s see how to do it right away.
The 3 ways to install a facebook pixel on your site
There are 3 ways to install the Facebook pixel on your website:
- You can install it manually.
- You can email it to a developer and ask him to install it for you.
- You can use a partner integration or a tag manager. (If you are not comfortable with coding, this is the best option).
Manual installation of the Facebook pixel
To install the pixel manually, you need to follow these steps:
- Create your pixel (as seen in the previous section).
- Click on the blue triangle “data source” and then on “continue pixel configuration“.

- Click on “install manually“.
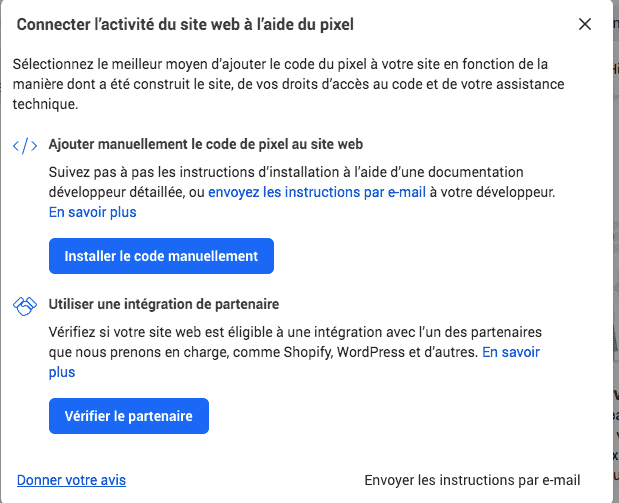
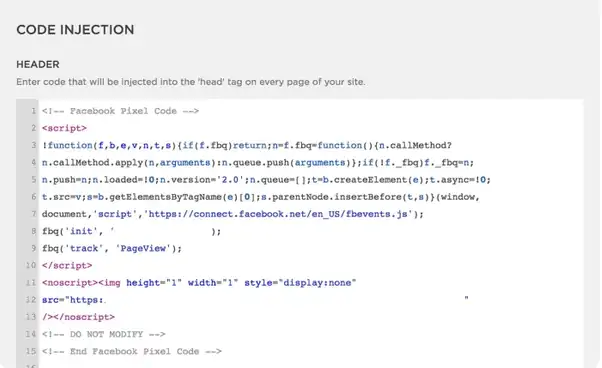
- Press “copy” and paste it into the header of your website (between the tags).

- Save your changes and that’s it! Your pixel is now operational!
As you can see, it’s quite simple in theory. But the problem is that this pixel must be integrated on all the pages of your site. So if you have a site with hundreds or thousands of pages, it can take time… But you may not have that time.
If you are in this case, don’t panic, you can ask a developer to do it for you.
Email the code to a developer
Not comfortable with coding? Don’t want to install the Facebook pixel yourself? Then you can contact a developer and ask them to do it for you.
To do this, simply:
- Copy the code provided by Meta and paste it into an email to your developer.
- Send the email and ask your developer to install the pixel on your blog. (He should know what to do).
That’s it! Once they install the Facebook pixel, your site will be up and running!
You don’t have a developer? That’s okay, you can also use a plugin to do it.
Use an integration or a partner tag
If you want to install the Facebook pixel but don’t want to deal with the code, you can use an integration or a tag manager.
- Tag managers (Google or Meta tag manager)
A tag manager is software that allows you to manage all the tags on your website in one place. This includes the Facebook pixel!
There are many tag managers out there, but the two most popular are:
- Google Tag Manager ;
- and Meta Tag Manager.
Both are free and very easy to set up.
Once you’ve set up your tag manager, you can install the pixel by following these steps:
- Go to your Facebook page and create a new pixel.
- Copy the code provided by the platform.
- Go to your tag manager and create a new tag.
- Select “Facebook Pixel” as the tag type and paste the code you copied in step 2.
- Save your changes and that’s it! Your pixel is now installed via your tag manager!
You use a CMS (WordPress, Shopify…)? Then there is an even easier way. Most CMS offer direct integration. Let’s take Shopify as an example to see what it is exactly.
- Partner integration with Shopify
If you have a Shopify store, you can integrate your Facebook pixel directly into it. This is the easiest way to install the pixel!
To do this, simply follow these steps:
- Go to your Facebook page and create a new pixel.
- Copy the code provided.
- Go to your Shopify admin panel and tap on “Online Store“.
- Go to “Preferences“.
- Scroll down to the “Facebook Pixel” section and paste the pixel.
- Save your changes and that’s it!
Your pixel is now installed on your Shopify store!
Now that we know how to install the pixel, let’s see how to set it up.
How do I set up the Facebook Pixel events?
Once theee pixel is installed, you need to set up the events.
Events are actions that users perform on your website (like adding a product to their cart or making a purchase).
There are 9 standard events you can track with the Facebook Pixel:
- View Content;
- Search ;
- Add to cart;
- Add to Wishlist;
- Initiate Payment;
- Add payment information;
- Purchase;
- Full Registration;
- Conduct a custom event.
Each of these events has a code. So to track a particular event, you will need to add the it to your “pixel”.
Good to know: You can find all the event codes on the “Facebook Pixel Events” page.
Once this code is added, Facebook will start tracking the event. You can then view the data in your Facebook Pixel reports.
You can also create custom events. To do this, you need to use the event configuration tool.
To do this you need to:
- click on the “Add events” button in your event manager
- then select “From Pixel”.
- A pop-up window should appear.
- Click on the “Open Event Configuration Tool” button.
Once you are in the Facebook Event Configuration Tool, follow these steps:
- Choose the “Category” of events you want to create (Standard or Custom).
- Choose the “Standard Event” you want to track or enter the “Custom Event Name.”
- Enter the URL of the page where the event will take place and click the “Continue” button
- Configure the parameters of your event and click on the “Create Event” button.
- Copy the code provided by Facebook and paste it into the header (between the tags).
- Save your changes and that’s it! Your Facebook events are now installed on your website!
Please note: there is also a “custom conversion” function which is very similar to the “custom event” function.
At this stage, everything is normally in order and functional. But let’s check if it’s really the case.
How do I check if the pixel I installed is working?
Once you have installed the Pixel, you can use the Facebook Pixel Helper to check that it is working properly.
The Facebook Pixel Helper is a Chrome extension that allows you to check if your Pixel is working properly.
Once you have downloaded the plugin, go to your website. If the Facebook pixel is working, the icon ( </> ) should light up green & blue.
If you see the icon ( </> ) in red, it means there is an error with your Facebook pixel. Click on the icon to learn more about the error and how to fix it.
Facebook Pixel: A summary…
As you can see, the Facebook pixel is an analysis tool that allows Facebook to track user behavior on your website.
Here are the main points to remember from this guide:
- The Facebook pixel can be installed directly on Shopify and other e-commerce platforms (WordPress, WooCommerce…).
- It allows you to collect data from your website visitors.
- You can use the Facebook Business event configuration tool to create custom events.
- With this code you can optimize your ads and improve your conversion rate.
- You can also use the Facebook Pixel Helper. It will help you to check if your pixel is working properly.